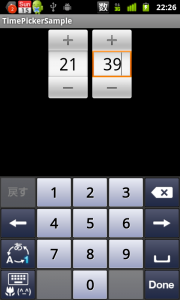
 Androidには、様々なWidgetが実装されています。
しかし、実際に使用するに当たり、取得したい情報が取れないなどの問題が起こる事があります。
今回取り上げる、TimePickerクラスでは、TimePicker#getCurrentHour() 、並びに、TimePicker#getCurrentMinute()を使用する際に、以下の挙動が起こります。
「+」「−」ボタンを押下時
想定通りに、入力値を取得出来る。
ソフトウェアキーボードからの入力時
入力が反映されず、変更前の入力値を取得してしまう。
※Focusが変更された時に入力値を反映するため。
今回から数回に分けて、TimePicker Widgetを自作し、上記課題を解決していきたいと思います。
その①では、AndroidOSが保持しているTimePickerと同等の外見を作成する所までを扱っていきます。
今回はXML Layout部分を中心に扱っていきます。
ポイントとして出てくる内容は、
- includeタグの使用
- selectorによる表示画像の切替
- EditTextへの android:inputType の指定
まず、AndroidOSが持つResourceを利用し、Viewを生成していきます。
●「+」「−」のボタン、入力窓のpngデータの場所
/platforms/android-10//data/res/drawable-hdpi/timepicker_down_*.9.png
/platforms/android-10//data/res/drawable-hdpi/timepicker_up_*.9.png
/platforms/android-10//data/res/drawable-hdpi/timepicker_input_*.9.png
※今回使用するTargetVersionはAndroid2.3.3とします。
→プロジェクトの res/drawable-hdpi 下にコピーする。
●各リソースのSelectorファイルの場所
/platforms/android-10//data/res/drawable/timepicker_down_btn.xml
/platforms/android-10//data/res/drawable/timepicker_up_btn.xml
/platforms/android-10//data/res/drawable/timepicker_input_btn.xml
→プロジェクトに res/drawable ディレクトリを作成し、drawable内へコピーする。
特に変更することはありませんが、どの様な内容が記述されているのか確認しておきます。
TechBoosterでは「ボタンの背景をダイナミックに変える」のエントリーにおいて、Selectorに触れています。
こちらも参考にどうぞ。
timepicker_down_btn.xml
<selector xmlns:android="http://schemas.android.com/apk/res/android">

    <item android:state_pressed="false" android:state_enabled="true"
          android:state_focused="false" android:drawable="@drawable/timepicker_down_normal" />
    <item android:state_pressed="true" android:state_enabled="true"
          android:drawable="@drawable/timepicker_down_pressed" />
    <item android:state_pressed="false" android:state_enabled="true"
          android:state_focused="true" android:drawable="@drawable/timepicker_down_selected" />
    <item android:state_pressed="false" android:state_enabled="false"
          android:state_focused="false" android:drawable="@drawable/timepicker_down_disabled" />
    <item android:state_pressed="false" android:state_enabled="false"
          android:state_focused="true" android:drawable="@drawable/timepicker_down_disabled_focused" />

</selector>
android:state_pressed = “true”といった風に、
state_* = ["true"|"false"] によって5つの状態に画像表示を振り分けています。
それぞれの状態の詳細はリンク先 State List の項目を参照ください。
上記引用内で使用されている項目は以下の通りになります。
◯state_pressed
押下されているか否か
◯state_focused
フォーカスが当たっているか否か
◯state_enabled
Disable状態か否か
次に、上記xmlファイルを引用し、TimePickerの外見を作成します。
main.xml
<!--?xml version="1.0" encoding="utf-8"?-->
<LinearLayout xmlns:android="http://schemas.android.com/apk/res/android"
	android:orientation="horizontal" android:layout_width="fill_parent"
	android:layout_height="fill_parent" android:gravity="center_horizontal">

	<include layout="@layout/ctime_picker" android:id="@+id/hour"/>
    <include layout="@layout/ctime_picker" android:id="@+id/minute"/>

</LinearLayout>
全体の構成を生成する main.xml ファイルの中身となります。
includeタグを使用することで、同じ内容の記述を減らしています。
ctime_picker.xml
<LinearLayout xmlns:android="http://schemas.android.com/apk/res/android"
	android:orientation="vertical" android:layout_gravity="center_horizontal"
	android:layout_width="wrap_content" android:layout_height="wrap_content">

	<Button android:id="@+id/increment" android:layout_width="match_parent"
		android:layout_height="wrap_content"
		android:background="@drawable/timepicker_up_btn"/>

	<EditText android:id="@+id/timepicker_input"
		android:layout_width="match_parent" android:layout_height="wrap_content"
		android:gravity="center" android:singleLine="true"
		style="?android:attr/textAppearanceLargeInverse" android:textColor="@android:color/primary_text_light"
		android:textSize="30sp" android:inputType="number"
		android:background="@drawable/timepicker_input"/>

	<Button android:id="@+id/decrement" android:layout_width="match_parent"
		android:layout_height="wrap_content"
		android:background="@drawable/timepicker_down_btn"/>
</LinearLayout>
続いて、Pickerの部分。
縦に並べる為に LinearLayout には android:orientation=”vertical” を指定しています。
また、それぞれの Backgroud 要素には、上記のSelectorを指定しています。
さらに、EditTextへの入力には、数字入力を行うため、
android:inputType に number を指定しています。
 EditTextにGravityを設定すると、入力したテキストが表示される位置がかわるんだね。エクセルで言うところの、セルの「上詰め」「下詰め」「中央揃え」だね! EditTextにGravityを設定すると、入力したテキストが表示される位置がかわるんだね。エクセルで言うところの、セルの「上詰め」「下詰め」「中央揃え」だね! |
これで、外見を整えることができました。
次回は、FrameWorkの内容をなぞりながら、Widgetのカスタマイズを行っていきます。